Building a solar Panel System

A cheap solar panel system will forever be the best solution to expensive electric bills. Solar cells are getting cheaper each year.
While you could pay up to $10, 000 for an off-the-shelf installation and could cover the system’s price in just over 10 years, it’s still better and more educational to make one yourself.
Let’s face it: we’re still living the post-traumatic stress of what happened in 2008, and we’re still living uncertain times when every cent we take from the bank is thoroughly analyzed before we actually sign a contract. The lack of financial stability has caused astute savings among those who learned how to save what they have, including energy.
We’re living in a war right now. The battle for energy efficiency has never been fought with more advanced weaponry, and the winners are all those who pay less for more month after month after month…
The first line of defense against paying more for electricity than you did last year is building your own solar panel system. Yes, you may have heard of Solyndra collapsing and may have even thought, at least once in your lifetime, how it would be like having your own solar panels mounted in your backyard or on your home’s rooftop.
And, for a moment, you were thrilled. It would certainly be nice being energy independent, let alone having an electric car that you could power with those solar cells to give you free rides for the rest of your life. And so on.
There’s a problem: how to you recover the costs within a couple of months?
Well, there’s a solution to that: build your own DIY solar panel system. Here’s how:
1. Get cheap solar cells from eBay
There are a lot of solar cell types that you can choose from. There are the Chinese ones, with good results, the best price, but not guaranteeing much, there are the Japanese ones with good performance, good price and the guarantee of Japanese work, and there are the American ones, with the best performance, the highest price and again, guarantees over guarantees. Choose wisely with regard to your budget. For example, a rule of thumb in 2012 would be that the cells shouldn’t sell for more than $1.3 per watt. Buy a couple of cells you think would fit your solar panel system’s budget and preferences, and move on to step #2.
2. Get tools
So you got your cells in the mail. Let’s say you received solar cells totaling 194 watts for $105+shipping (an actual example from ebay) that you carefully unpack, taking care not to break them, as they’re very thin. Now find yourself some tools like a soldering iron, solder, solder paste or flux (for removing the grease off the wires), a saw, some wooden board and protective glasses, a multimeter to measure voltage and amperage. And, of couse, a pencil and a ruler.
3. Plan your solar panel system carefully
 Place the square solar cells onto the wooden board and draw separating lines (carefully). You’re halfway through, after all.
4. Wire the cheap solar panel system
After you planned the physical arrangement of the solar cells on the board, now start soldering the wires to the solar cells and then to each other.
First, link the cells in series. Respect this basic rule, just like if you were soldering batteries: the positive lead is to be soldered to the negative lead of the next cell. Do this for as many cells as needed to reach a voltage of 12 or 24 volts. Do not exceed that as you would enter the area of dangerous voltages. You want to generate serious power here, not fool around and you don’t want to electrocute yourself to death (take care!). The power remains the same, after all. You just need a minimum of 12 volts to kick-start a 12V inverter for generating 110/220V AC or charge your 12V battery packs. Linking the cell in series will increase the voltage.
Then, stick the cells to the board, carefully. It would be better if you made them a frame where they can be inserted individually, so you can replace defective ones, just in case.
Before you’ll have stuck all the cells in the right place, make sure you drill holes for the wires, individually. Make connection buses along the positive and the negative lead and then connect those buses (thicker wires) in parallel (plus to plus, minus to minus) to have a parallel connection and increase the amperage.
 5. You’re done!
You made your first functional solar panel system, and now you can take it outside to see what it’s generating. You first have to measure the voltage, and then the short-circuit amperage. Just make sure your ammeter bears the solar cells’ nominal power (108W at 12V means 9 amps).
You can now power anything that runs on DC current, charge your car battery and so on. If you succeeded doing these 5 steps, then you can order some more solar cells until you reach the power you want for your system. Remember, the more power you want, the larger the inverter you’ll need to get.
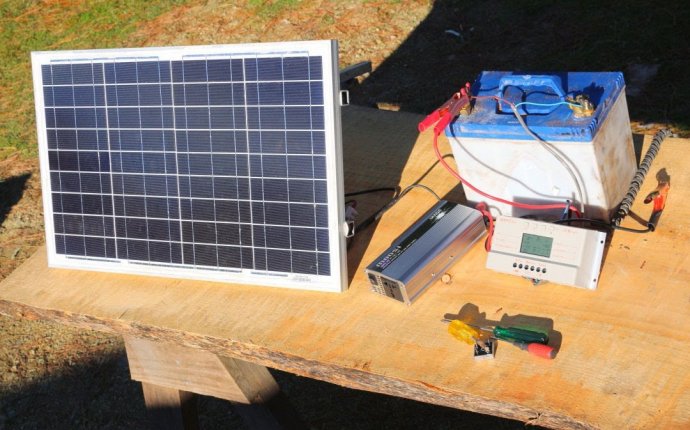
Now the hardest part of building the solar panel system, which requires increased care and seriousness in the quality of the work done, is connecting the panel to a pack of batteries and then to an inverter. You can use a computer UPS (Uninterruptible Power Source), but you’ll need more power to power your home. However, the batteries don’t have to be new, and they can be the lead-acid type, but it’s advisable that you should buy specially crafted ones for power storage and deep cycle use, since car batteries can only cope with high loads for a short time, and if they’re accidentally discharged below a certain threshold, you lose them for good.
Of course, there are lots of secrets you’ll find out only through practice, but the overall idea is that such a system is cheap and for 200 watts of power you’ll need solar cells worth about $200 and batteries worth about $400 to $500. If you get an inverter from ebay, or even better, buy a used UPS (handle with care), you’ll not go over $500 for the whole system. If you want to really power your entire home, you’ll need about $1, 000 to become truly energy independent (as in not paying a dime to electric utilities). How does that sound?
Next you could try building a wind turbine that would supplement your power needs at night, when the Sun is over Europe (or vice-versa).
I know it sounds tough, and I know you’ll have a hard time getting started, just like with all the things you do for the first time, but after you start you’ll see it’s not such a big deal. And you don’t have to pay $10, 000 for a solar panel system that’s only going to do the same thing as your own hand-built one.


